 Quick Navigation
 All projects
  Hardware
 Links
Links Top projects
Alan numitron clock
Clapclap 2313/1386
SNES Pi Webserver
USB Volume/USB toys
Smokey amp
Laser cutter
WordClock
ardReveil v3
SNES Arcade cabinet
Game boy projects
cameleon
Home Presence Detector
 GitHub
AlanFromJapan
 Contact me
 Who's Alan?
Akizukidenshi
Elec-lab
Rand Nerd Tut
EEVblog
SpritesMods
AvrFreaks
Gameboy Dev
FLOZz' blog
Switch-science
Sparkfun
Suzusho
Datasheet Lib
Reddit Elec
Ermicro
Carnet du maker (fr)
iron station upgrade
Last update: Sat Jan 10 23:04:54 2026
Every where I read, people say that working with the 10 $ iron is bad and should be avoided as soon as you start doing "serious things". Next step is to move to a branded iron, with a variator to control the temperature and maybe a precise selection of temperature (display or gradation). Well shame is I happen to like my 10 $ 40W iron, even if I agree it's too hot, but has the punch when needed for a quick start or some heavy job.
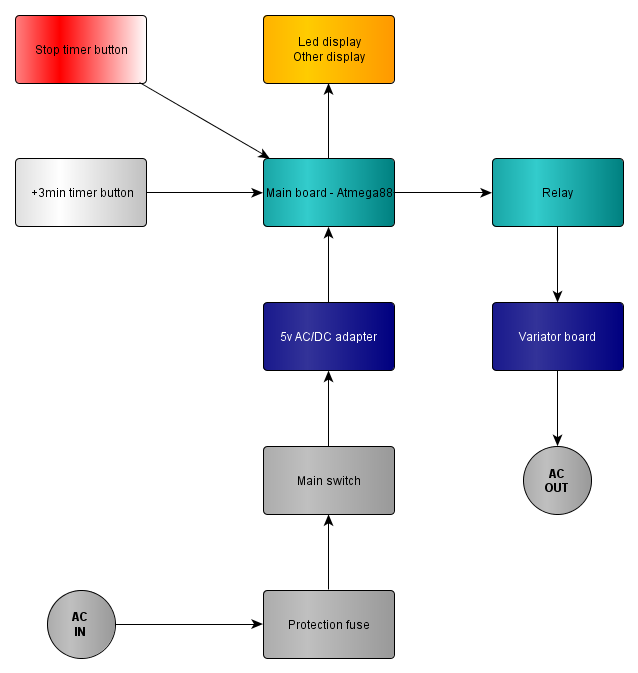
A few months ago I bought a simple 6$ variator kit and setup my iron on it, worked just fine. But I wanted to have more safety, especially not risk to forget my iron on. So I though of combining both: a variator, a light indication of the ON status, and a timer ! 10 minutes max : press the white button and get 3 minutes of heating, press the red button and stop now.
I found afterward a video of the crazy-fantastic Dave of EEVBlog that was also having the same concern of "is my iron still on" and hacked his Hakko led http://www.youtube.com/watch?v=rtlN0b-gkic
Functions and parts
- Variator for the power : http://akizukidenshi.com/catalog/g/gK-00098/
- Fuse to protect the whole thing
- ON status light
- Microcontroller (ATmega88p) and Timer 7segments (reach zero turns off) : Rapide7seg
- Switches and buttons :
- General switch
- %203 minute button
- Stop now button
- A relay 5v controlled http://akizukidenshi.com/catalog/g/gP-01214/
- A scavenged 5v wallwart
General schema

electrogeek.tokyo ~ Formerly known as Kalshagar.wikispaces.com and electrogeek.cc (AlanFromJapan [2009 - 2026])